Ms Carmyn's Mythbusting Guide to Corsetry
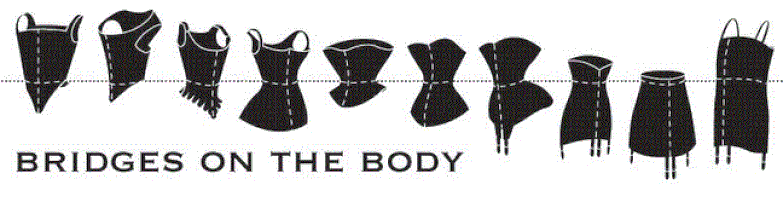
The first thing to think about if you are interested in making a corset is the type of silhouette your are looking for, and what kind of body you're making it for (large or small bust, long or short torso, large or small hips). There are thousands of different kinds of corsets and each type of corset suits a different sort of figure and/or creates a different type of silhouette. The diagram above shows some of he shapes corsets have taken in the last 450 years - everything from corsets that flatten out your chest or nip in your waist to corsets that flaunt your booty or present your breasts on a 'platter'!. The title refers to a fabulous blog by a sewist who was making a corset from each period of history.
Corset Myths
|
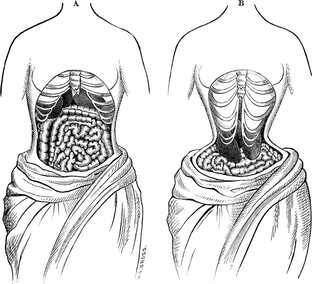
The image to the left is from a C19th medical text - written by men, for men about garments they did not (usually) wear. The idea that women of the past squeezed their corsets so tight that they dislocated their organs is almost as ridiculous as the idea that they amputated a rib to make their waists squeeze smaller - We know this didn't happen because there were no antibiotics back then and women who tried this would have been very likely to die from infected wounds!
In fact - all those tiny-waisted women you see in the fashion plates are no different to the photoshopped, stick-thin models most designers use to show off their clothes today. Most extant (still existing) gown show that women had pretty similar waist sizes to our own (they were a little bit smaller, but that was largely because they were also a but shorter, on average). This shows most women didn't squeeze their waists into fashionable wasp-like silhouettes, and those who did usually did so only on special occasions (like losing weight for a wedding). After all, women worked and cleaned and partied and played sport in corsets, just like you do in your bra. |
Contemporary women who wear corsets a lot, will tell you that a well-fitted corset, like a well-fitted bra, is comfortable and supportive. You can watch clips about this below. If you are making a corset for yourself, try to find someone experienced to help you fit your garment. It may take several tries before you work out how to adjust a pattern so that the corset is comfortable on your precise body shape. Unless it is a costume corset, you need to think about what to wear under it, so that it doesn't 'pinch' - traditionally corsets were worn over linen chemises (blouses) that kept sweat from building up in the corset and provided a comfortable underlay so that boning and lacing didn't come into contact with your skin. If you are not swearing a corset as an outer layer, then you might also need a chemisette - a sleeveless top that goes over the corset so that it doesn't show under your dress. see Ms Carmyn if you want to know more about this, or look online for cosplay or historical sewists' blogs, volgs and youtube channels.
What type of corset does your design require?
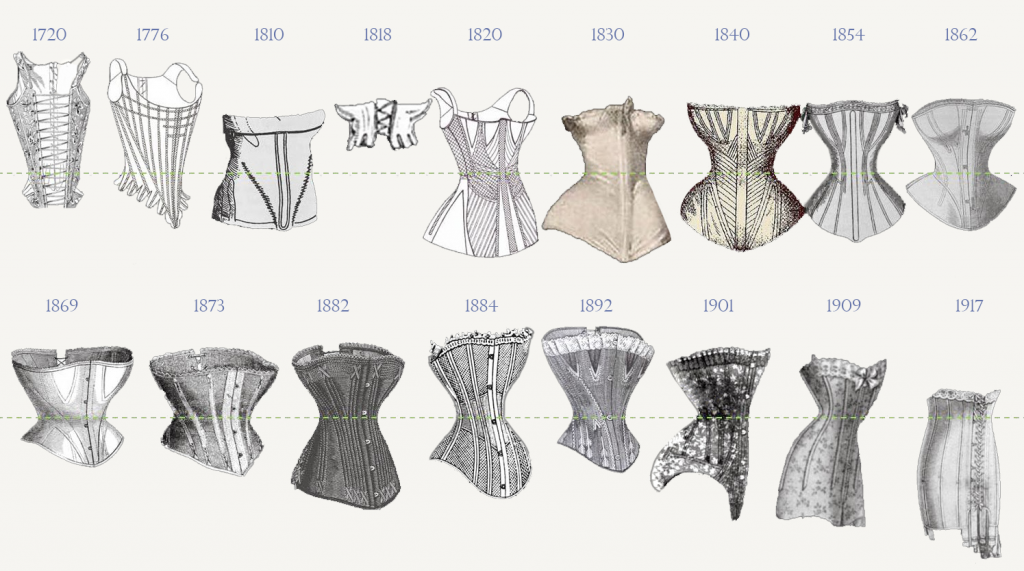
The first corsets (C17th and 18th) were called stays (See this clip if you're interested in the difference between stays and corsets). They were designed to flatten your breasts and turn your upper body into a cone shape. By the classical period (1810s, Jane Austen's era), fashionable women were creating a shelf-like effect using short corsets with v-shaped insets to 'cup' their breasts (like an extreme push up bra) or longer corsets that slimmed down their hips.
Fashionable silhouettes changed throughout the C19th, using corsets to emphasize wider hips and bigger busts, which created the illusion of a narrower waist. this was assisted by other undergarments such as crinolines and bustles, which supported wide skirts and gave the wearers enormous hips and/or bottoms. During this time many new types of corsets were invented for women with various health conditions or for different types of sports (even swimming!).
By the turn of the C20th, women were wearing an Edwardian 'pigeon-shaped' corset which pushed their breasts forward into one large mono-breast and their hips backward to emphasis their booty. The final fashionable corsets were the slimline corsets of the 1920s, designed to hide breasts and hips in an era when a boyish figure was most fashionable. By this point bras were starting to be mass-produced and corsetry became less common.
Let me know if you need detailed information about a particular style of corset - I most likely have access to information about it.
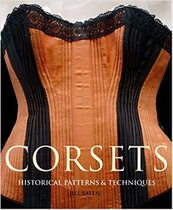
Corsets : historic patterns and techniques (available in the library at NF 391 - under the window near the Yr 11 study) is a fantastic resource with pictures of extant corsets from 1750s to the early C20th. As well as the pictures it has patterns (which you'd need to adapt) and instructions about different techniques used throughout the history of corset making. Unless you are a very experienced sewer, I suggest you use this book to find out which shapes appeal to you as a designer, but look elsewhere for an actual pattern.
When you have found the designs you like, photocopy the patterns, and then cut out and sticky tape the pattern pieces together to see how they work in real life. You could even use skewers along the boning channels to see how the boning works. Pay careful attention how the different directions of the boning might support your body in different ways (eg in the pictures for 1820 and 1840 above). Don't forget to take photographs of this experimentation to use in your portfolio.
The corsets created by Simplicity, Butterick on other contemporary companies are almost all based on the 1880s silhouette. If you like a different type of corset/sillhouette, talk to Ms Carmyn about where to obtain a pattern. She will be able to recommend a reputable pattern library where you can buy and download an e-pattern. She can also help you draft a pattern from this book (worth trying if you have lots of free time and are interested in a career in costuming), but buying a pattern is less time consuming.
Corsetry Materoials
Fabrics: Corsets need to be built to take more pressure than a dress or blouse because they are closer fitting. this means you can't pick a fine, loosely women or knit fabric. Pick something with lots of body and very little stretch, like a type of canvas or a coutil. If you're wearing the corset as an outerlayer - use the strong fabric as your lining and layer your fashion fabric on the outside. If you know it's going to be worn alot, interline it with more canvas/coutil between these layers.
Binding: You'll need some kind of fabric to sew over the edges of your layers to make them look neat. You could use a bought binding or create your own by cutting strips of your fashion fabric. Depending on your design, the binding could match your fashion fabric or contrast in colour or pattern.
BONING: While you can buy plastic boning at spotlight and other fabric stores, if you plan to wear your corset much, you might want to look into other types of boning which are more comfortable and/or easier to store. Here are some pros and cons of different sorts of boning (from my point of view). If you think boning is too expensive to use in your design, try using cable ties or bendy plastic rulers (make sure you sand the edges and corners though, or they will cut through the fabric)
Rigolene plastic boning: Pros: Cheap and easy to find, come on a roll so you can cut exactly the length you need, easy to sew over, sometimes comes covered in a cloth tube; Cons: never completely loses it's curve not especially comfortable, (which could be a good thing if the curve is where you want it), must be stored carefully because once they're bent, you can't unbend them; too bendy for a good historical silhouette, corners will carve though your fabric if they haven't been sanded flat and/or flossed, plastic is bad for the environment.
Plastic Boning: comfortable, can be shaped with an iron, don't need to worry about it piercing the fabric one you cut and iron out the edges; Cons: plastic is bad for the environment
Featherbone: Pros light and comfortable, best substitute for whalebone, historically accurate; Cons: very hard to find, difficult to work with
Spiral Boning: Pros: very comfortable to wear because it moulds exactly to your shape as you move (think tutu bodice), best for curved lines,can be taken out and reused, Cons: Not useful for early stays which have a stiff sillhouette, very hard to cut (bolt cutters are best!), expensive, requires special caps to keep the ends from cutting your fabric (once they're capped its fine), may eventually rust if it gets cleaned alot, heavy
Sprung Steel: Pros: very strong and great for straight boned corsets; cons: doesn't work on curves, heavy, make sure you buy nylon coated steel otherwise it will rust
Rope or Reed (like the front of the book above): Pros: historically accurate (esp if you want to make renaissance gowns), very comfortable, light, great for small busts; cons: difficult to make, hard to make support large busts, wrinkles easily so may need heavy interlining to make a smooth bodice. [some people have used electrical cording as boing, which looks great but it rusts easily if you try to wash it)
Cable/Duct ties: Pros: very comfortable to wear, light, extremely cheap and easy to find, gives a modern silhouette, can be cut with scissors; Cons:too bendy for stiff sillhouettes,
Bendy plastic rulers: very cheap, effective for early stays where there is lots of boning and the aim is to flatten the torso; hard to cut without tools, must be sanded very well
Lacing: If this is your HSC project, you might wish to try making your own cord through finger loop braiding or lucet work. See Ms Carmyn for more information about these techniques.
For historical Victorian corsets, you'll also need a busk, though many modern designers (including the designers of contemporary pattern companies) use an early style of lacing instead (which creates a softer silhouette at the front and will make supporting large busts harder). Busks are available at specialised corsetry supply stores. A simple wooden ruler can be carved, sanded and placed in a channel as a repacement for a busk, but you will probably need to redesign the opening to accommodate this..